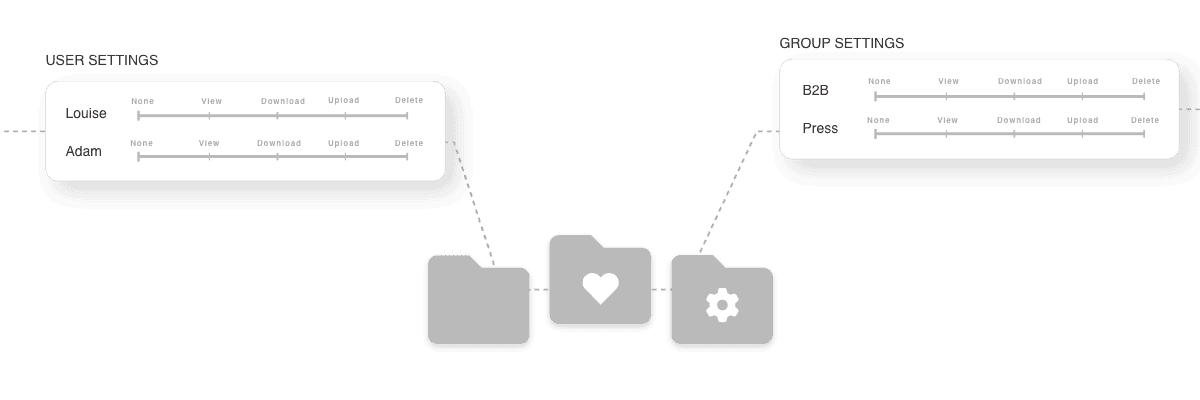
Setting up and managing access in Kontainer is simple. You can easily give, edit, and remove rights for user groups or individual users.
MANAGING ACCESS
Depending on user types and permissions, there are different ways to access Kontainer. You can see and edit everything when you log in as an admin user.
What your end users see can range from a single image to your entire asset library, from view only to delete rights.
Access to files is granted via folders, or you might call them areas. There are five levels of access:
- None
- View
- Download
- Upload
- Delete

Permission can always be changed, and any changes are instant. Users can have a sum of permissions granted via group memberships and individual settings. More on that further down.
In addition, to file access, there are two other aspects to consider:
- Download options – determine how users can download images (if they are allowed to download)

- Tag visibility – manage the visibility of tagged information

A user will never have access upon creation. All-access is actively granted or determined by rules.
This guide covers the basics of different user types and permissions you can set in your Kontainer.
PRESETS FOR PERMISSIONS
Before you even start setting up users, there are three types of presets to consider:
- Which tags to expose
- What download templates to create
- Do you want a brand section
Have a look at these tools when you are setting up users and user groups. You can always come back and add/edit these presets.
Field Sets
Pro+ feature
With Custom Fields, you can tag your images with attributes, data and information. See the guide on Custom Fields here.
However, often our customers want to vary the information exposed to different users. This is managed under Field Sets.
In your Admin menu on the far left, select Access → Field Sets to make presets to activate on groups or individual users.
 If you are setting up from a demo profile, there are a few demo field groups to delete before you start. Click on the three dots of each group and Delete.
Create New field sets from the top right button. Start by giving the set a name.
It could be role-based, like:
- German Distributors
- Internal Customer Service
- External Agency
Or maybe purpose-based, like:
- Copyright
- Products Information
- Consent
Users can have access to more than one set of fields.

Once created, click on your new field set to select field access.

Make as many field groups/sets as you see fit. And then, let’s move on to download options.
Download Options
Duplicated images are a headache, so we aim to avoid duplicates in Kontainer. We encourage you to store only your originals and use templates and customize any additional download options needed.
For this reason, you can set up download templates. Check out this guide here if you don’t know how to set them up.

Once you have created your download options, they are easy to activate for your users. We’ll get back to that further down.
Brand Section
The last thing to touch on is the Brand Section which you can add to the left-hand menu (not visible to Admin users).
You can activate this section on your users to display contact details, Social Media links, and more.

We have a complete guide here if you want to set that up.
Now, let’s have a look at creating users and user groups.
SETTING UP USER GROUPS
Pro+ feature
Okay, so user access can be set up on two levels:
- User groups
- Individual users
Permissions are set in the same way for individual users and groups.
When access is set on a group level, it’s quick to add new users and make changes. The initial effort will give you a better overview and save time on user management as you grow.
What Are Groups?
You can approach groups from different angles. You can think of them as user types, like:
- Sales Team
- Distributors
- Press
- Agency
And as an access type, such as:
- Brand Guide Internal
- Brand Guide External
- German Market
- Danish Market
Users can be added to multiple groups.
For example, a German marketing agency gets access to the groups:
- German Market
- Agency
- Brand Guide External
Set Up Groups
Go to: Access & Groups.
Here you might find some demo groups. To remove these:
- Click on the group
- Go to Group settings in the group menu
- Delete Group in the top right corner.
You click on New Group (in the top right corner) on the Groups page to create a new one.

Give the group a name that makes sense to you. It could be for your Sales Team, Distributors, Customer Service, etc.
Tick the box Active and then Save.

You will be taken to the Permissions menu of your new group. Here, you start by selecting folder access.

First, have a look at the permissions grid below to get an idea of the different types of access.
PERMISSIONS GRID
Here is an overview of the folder permissions and user access types.
| View Rights | Download Rights | Upload Rights | Delete Rights | Admin User | |
|---|---|---|---|---|---|
| View files in folders | x | x | x | x | x |
| Share files in folders* | x | x | x | x | x |
| Comment on files* | x | x | x | x | x |
| Download files | x | x | x | x | |
| Add files to Album | x | x | x | ||
| Edit file data/tags* | x | x | x | ||
| Rename files | x | x | x | ||
| Upload files | x | x | x | ||
| Create new folders | x | x | |||
| Use CDN links* | x | x | |||
| Move files | x | x | |||
| Delete files & folders | x | x | |||
| Use Page Editor | x | x | |||
| Restore files from Trash | x | ||||
| Manage settings | x | ||||
| Create & manage users | x | ||||
| Create & manage groups | x | ||||
| Create Download Templates | x | ||||
| Create tags/values* | x | ||||
| Manage user permissions | x | ||||
| Configure Smart Folders | x |
*This feature needs to be activated before use and could include additional costs.
SET PERMISSIONS
Depending on your setup, there are generally two or three aspects of access you need to consider:
- Folder access
- Download options
- Field visibility
The latter is applicable if you have set up Custom Fields.
Let’s have a look at folder access.
Folder Access
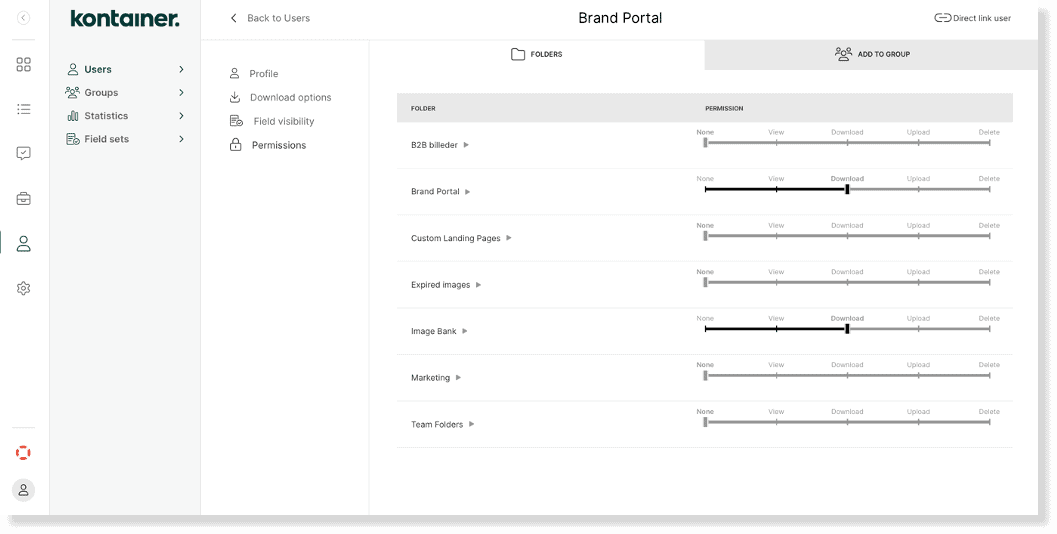
Fundamentally, you need to give groups or individual users access rights to folders. There are five permission levels:
- None
- View
- Download
- Upload
- Delete
With Delete rights, a user can also create new folders. They can create subfolders in the specific folders they have Delete rights to.
Please note that subfolders automatically inherit access unless manually overwritten. Below, you can see an example where the inheritance has been manually revoked in one subfolder:

Permissions can also be accessed from the top right corner of a folder.

This shortcut is to check or edit access to that specific folder.

The next step is to look at download options.
Download Options
Go to Access → Users and click on a user to change their settings.
In the Download Options, you can select which download templates the user should be able to choose when downloading files.
Furthermore, you can disable custom editing when downloading.
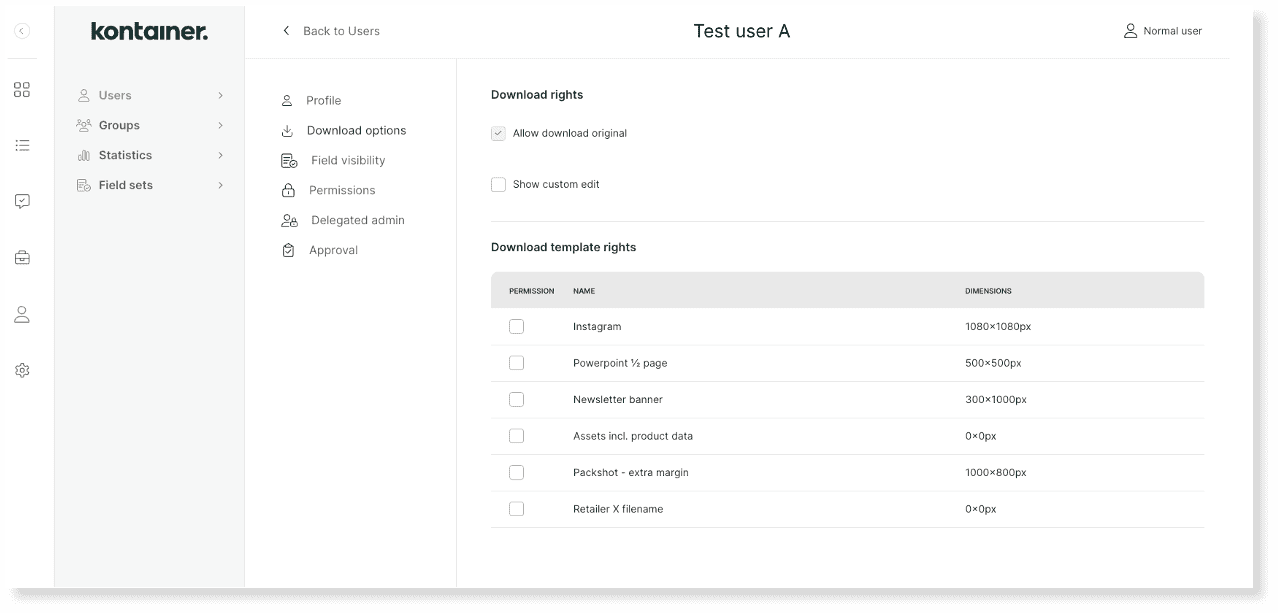
Download options is a universal setting. You can use the download options for any file you have download (or more) access to.
The last thing to look at is file data/field visibility.
Field Visibility
Pro+ feature
To edit access to the Field Sets you set up earlier in this guide, go to Access → Users and select a group or user.
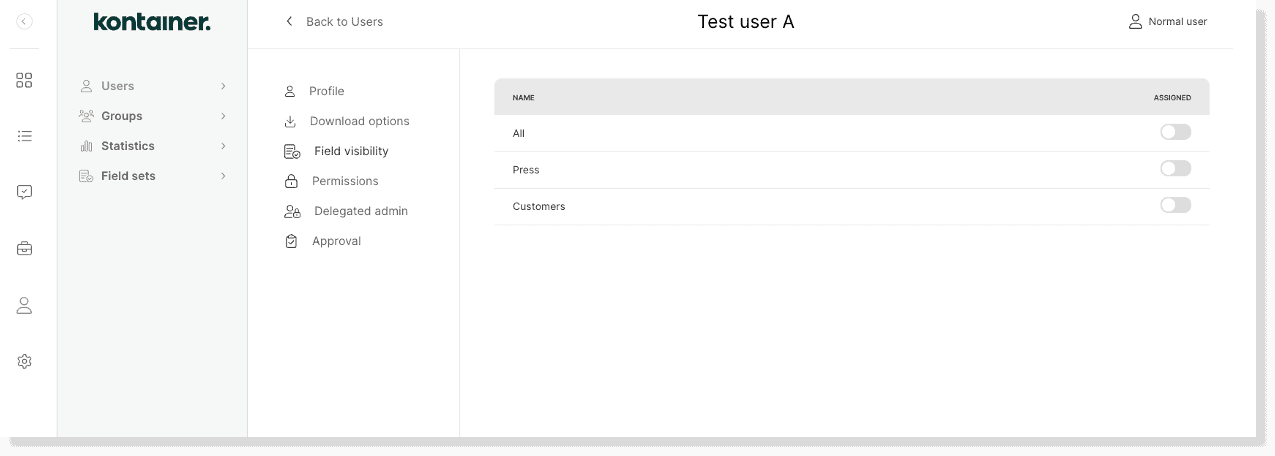
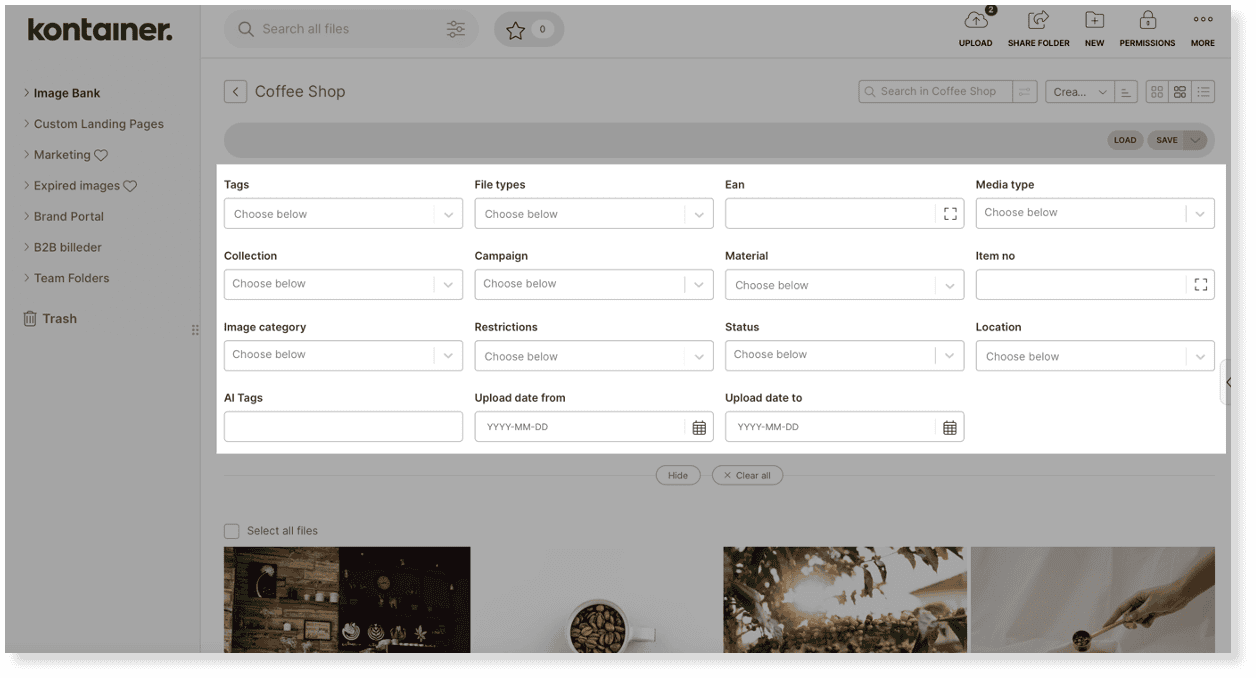
Under Field Visibility, select the field sets you want to activate on the group or user.
Any field also set up as a search filter will appear in the advanced search.
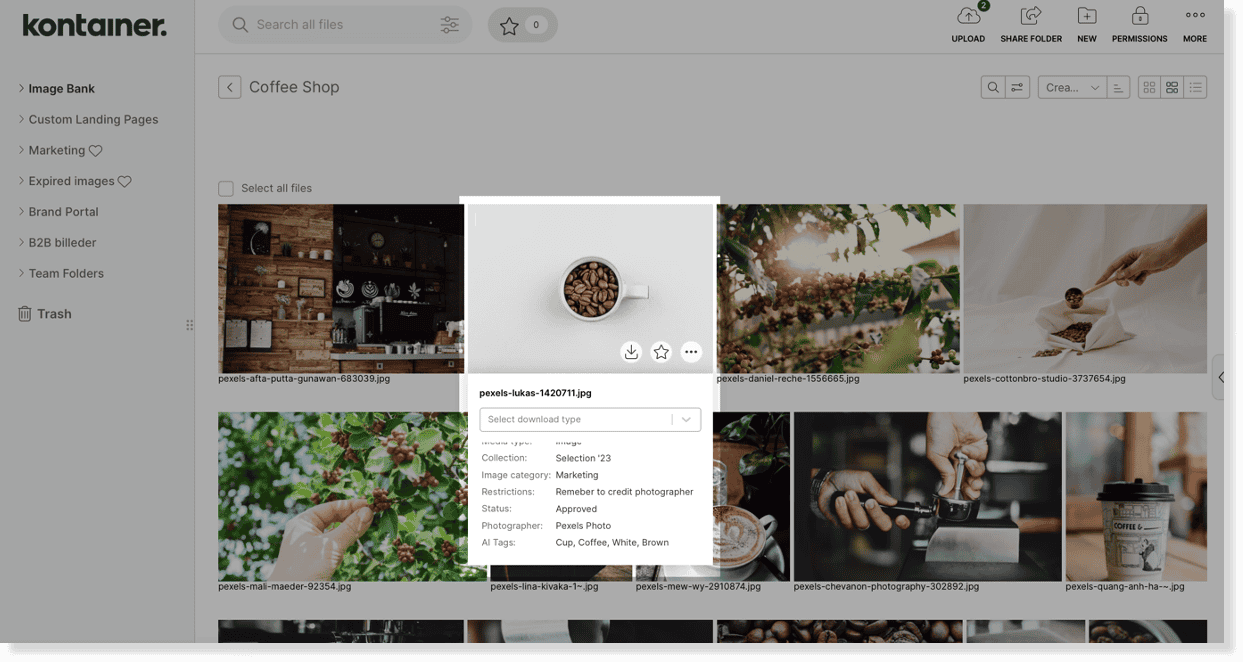
And the user will also see the tagged information underneath an image when they hover over it, as below.
Access to PIM Channels
Any user or user group can also be given access to PIM.
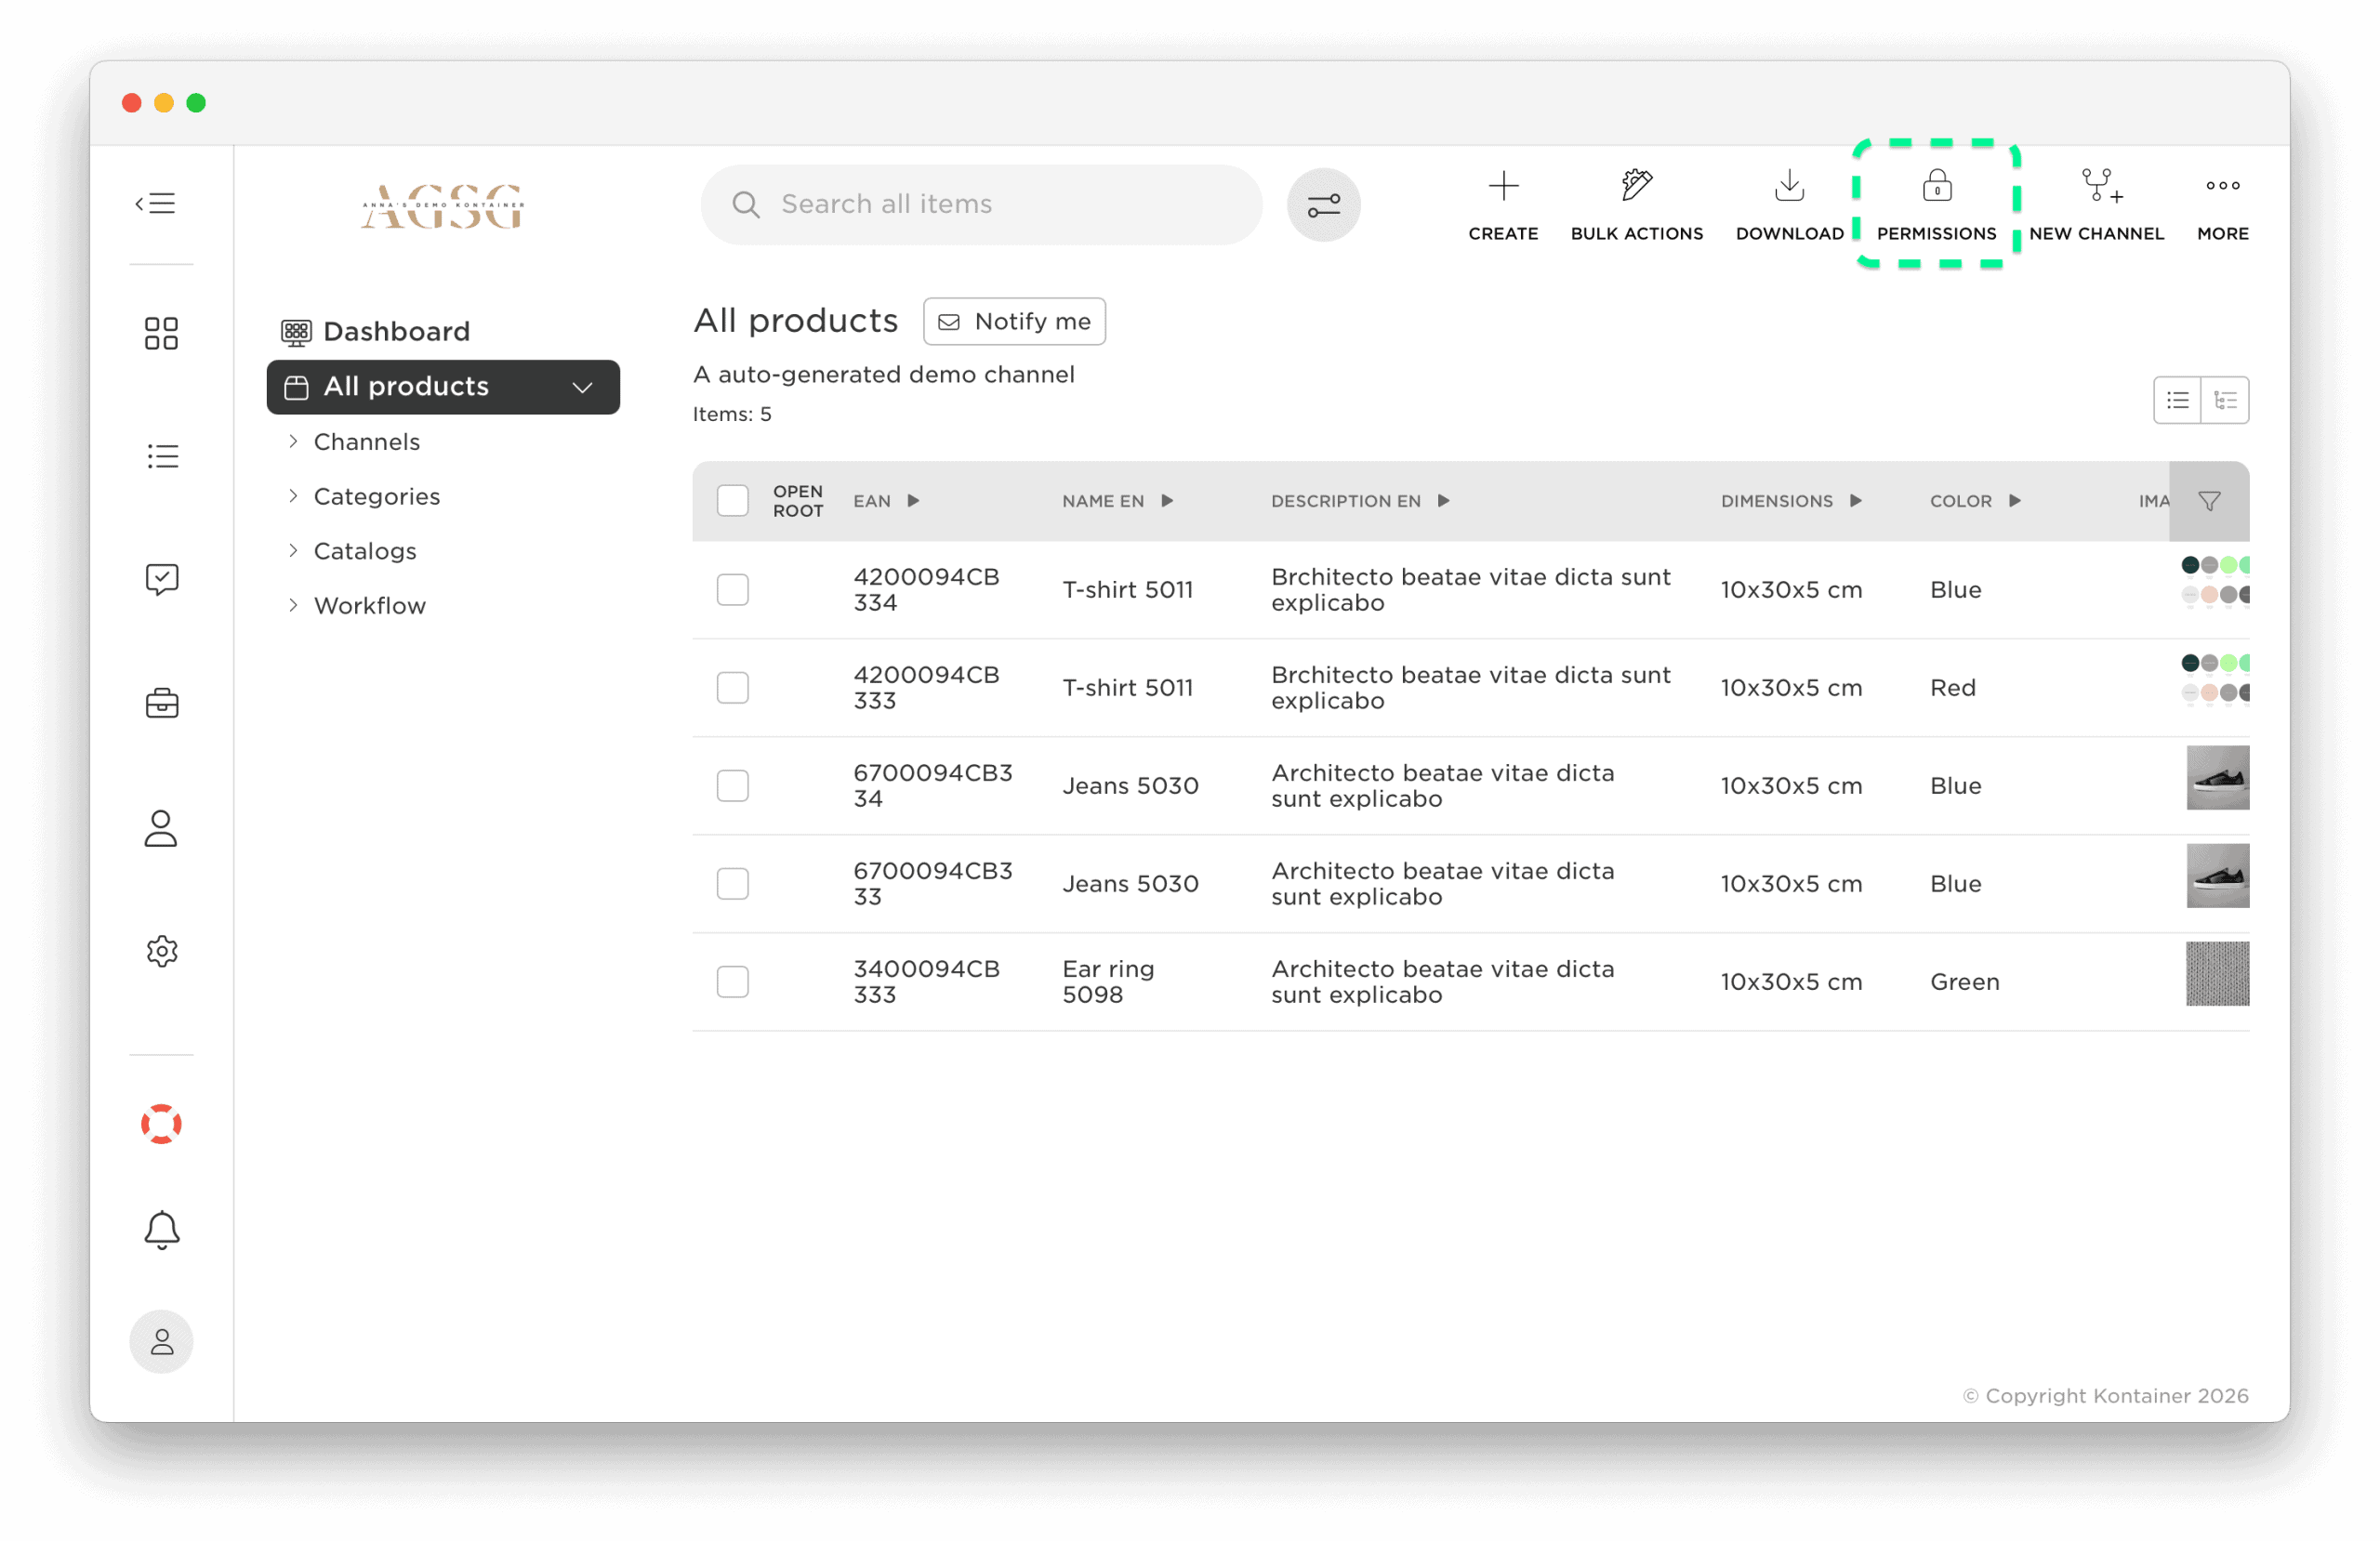
Access is managed by channels and can be accessed from the top-right menu.
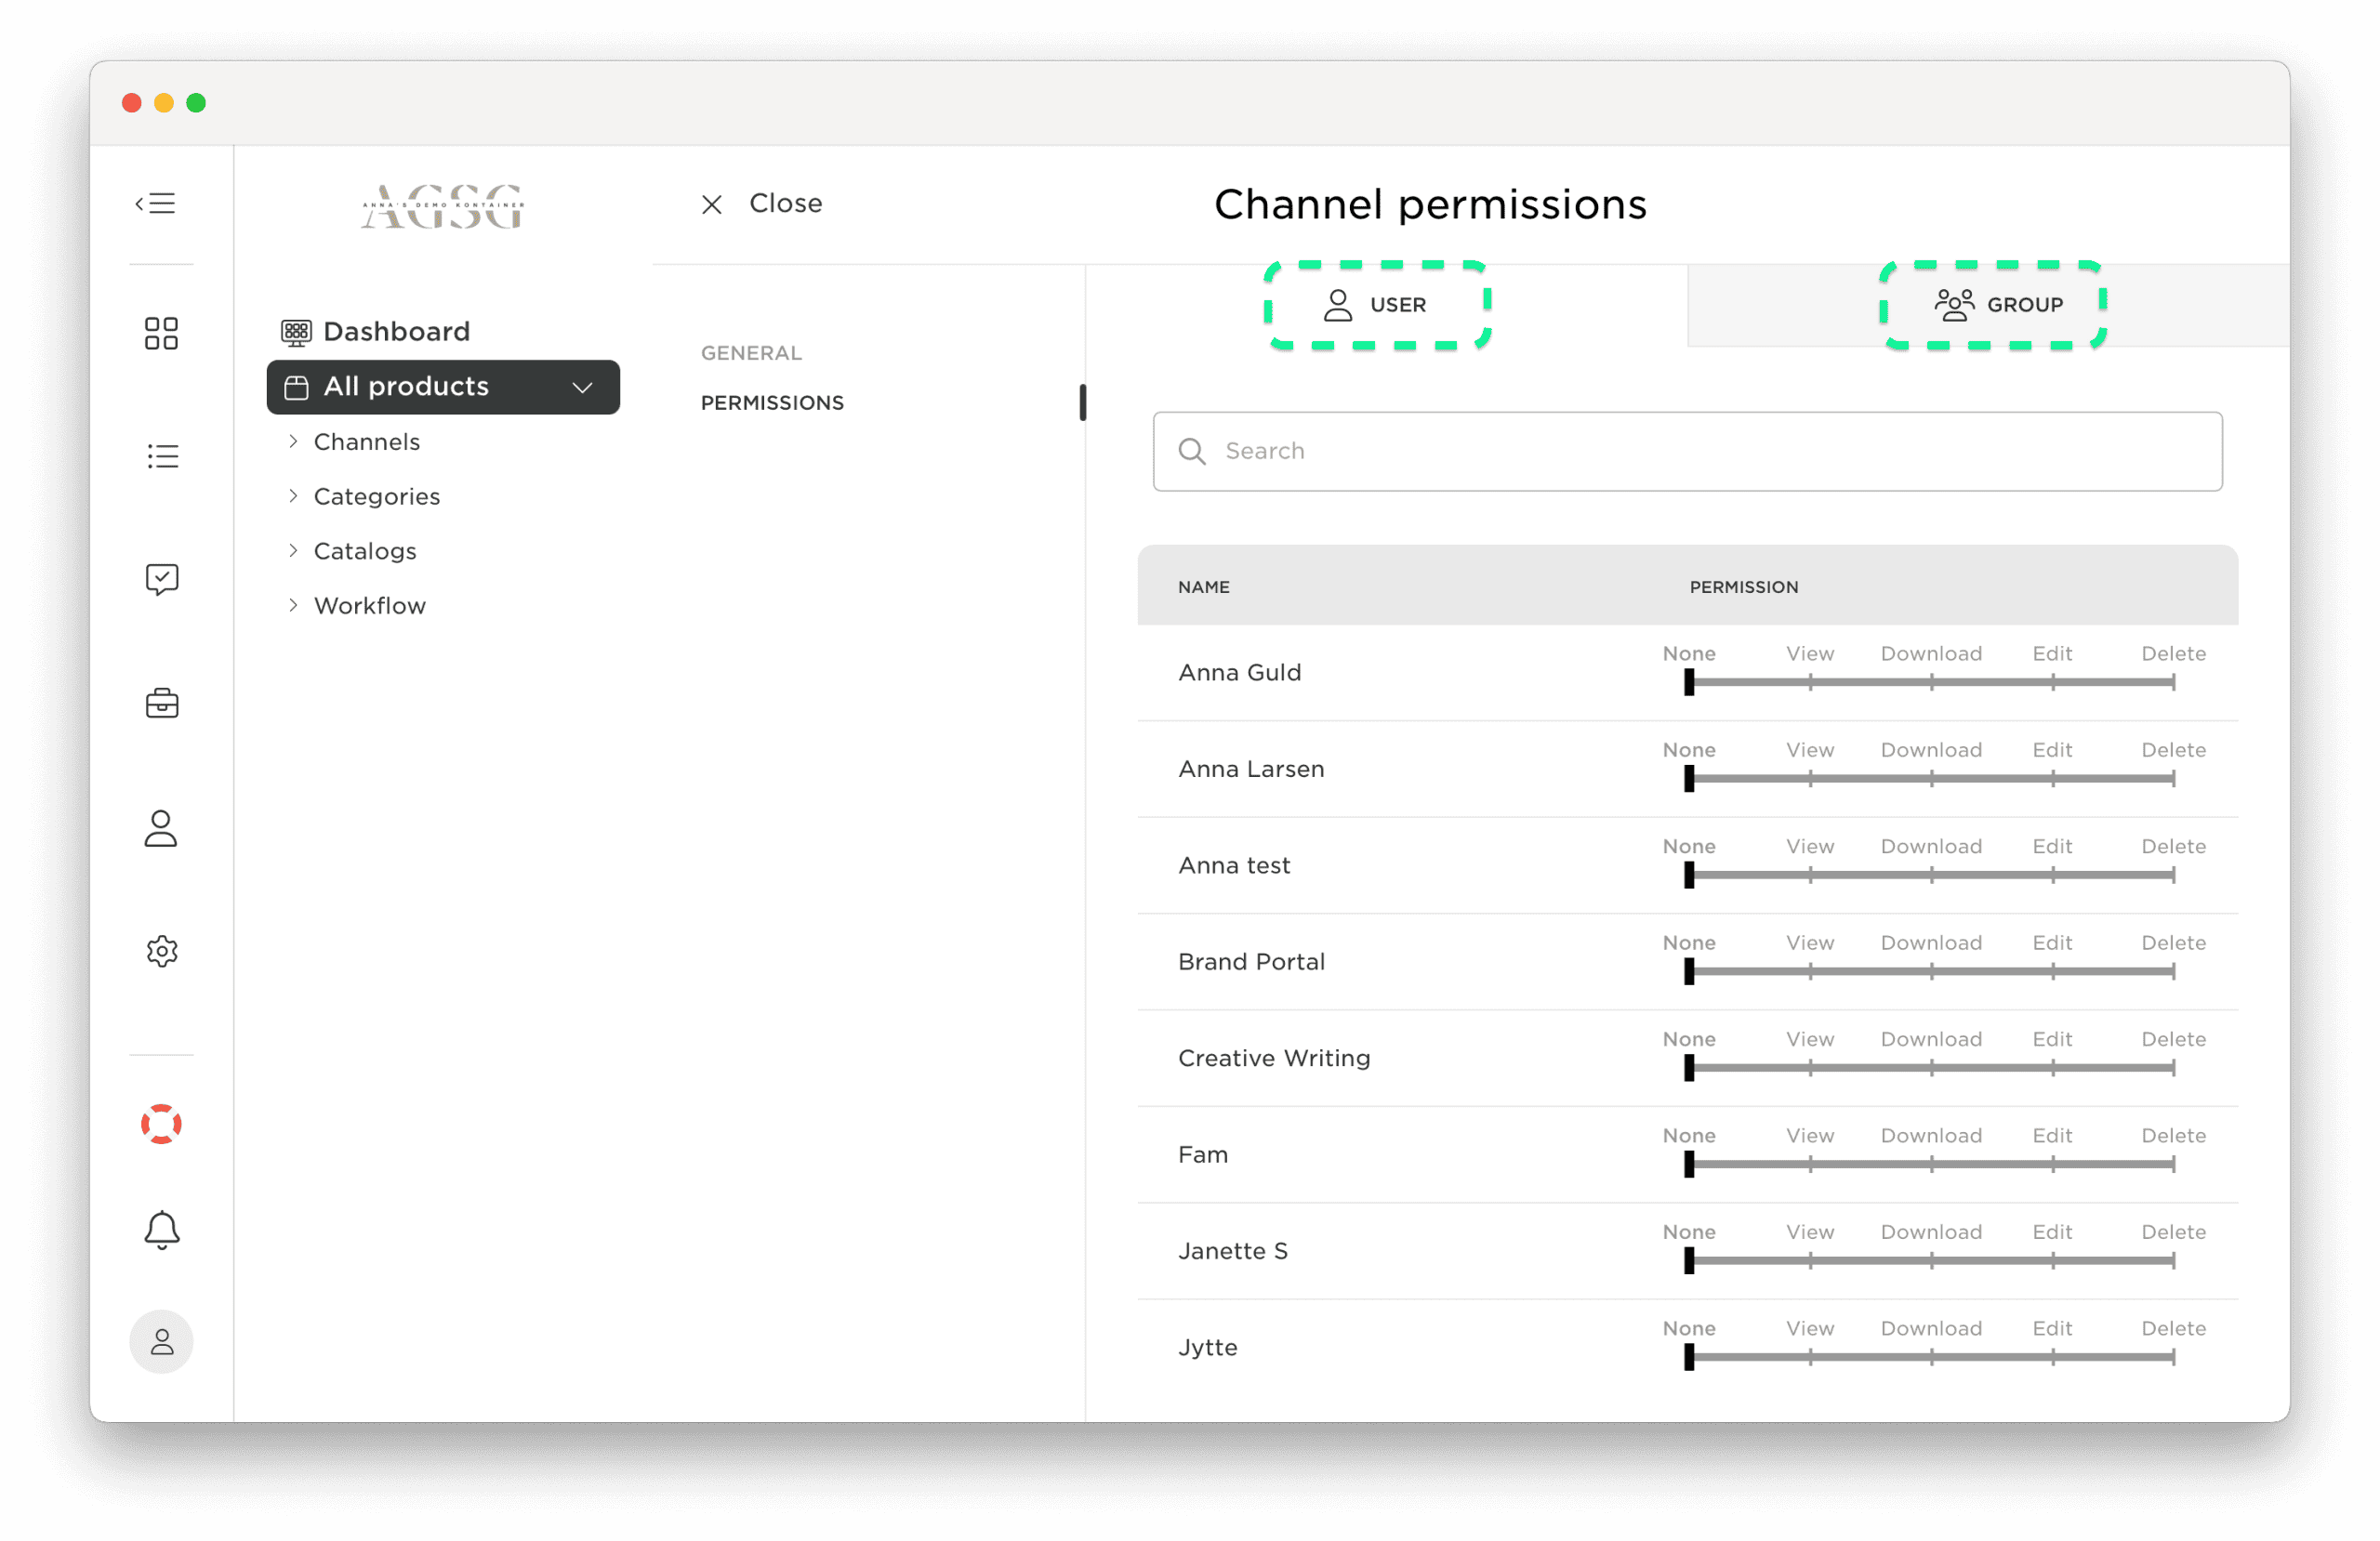
In the Permissions tab, you can give users and user groups different levels of access:
- View
- Download
- Edit
- Delete
Learn more about Basic PIM functions here.
CREATE USERS
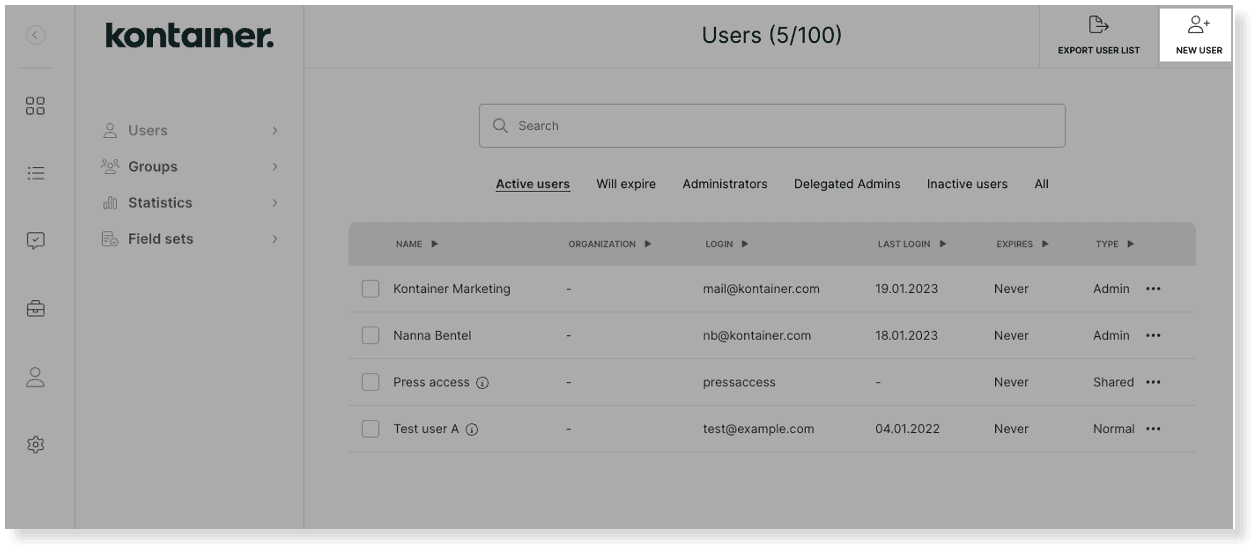
Go to Access → Users → New User for individual user setup. Quickly add them to a group and/or select individual Permissions.
There are 4 types of users:
- Admin Users
- Normal User
- Open Portal
- Shared User
And an additional option to add a:
- Delegated Admin
Each has unique functionalities that we’ll dive into below.
User Count
In your Kontainer plan, you have a certain number of users included. You find that count in your user list.
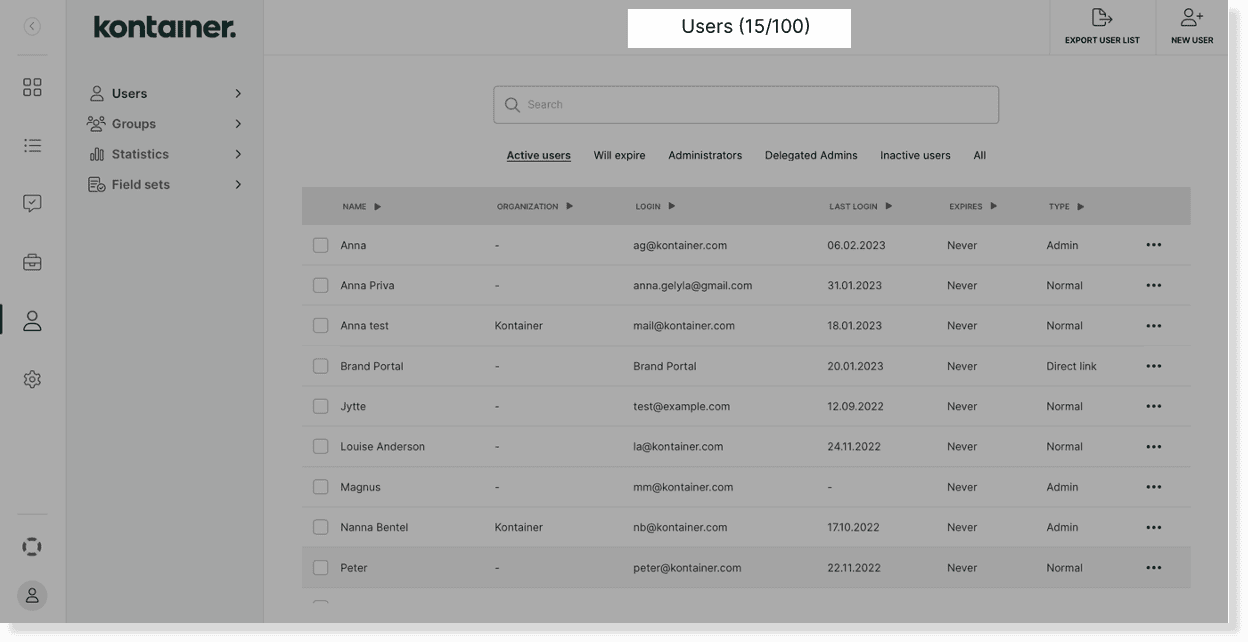
It’s important to mention that Open Portals and Shared Users only count as one user.
Example: I set up an Open Portal called ‘Brand Portal.’ I can use that link in as many places as I want. It will ever only count as one user.
To add more users to your plan, click here.
Create an Admin User
Admin users see and manage everything. They can receive notifications when new comments and files are added.
This user type is the only one with the rights to create and manage other users.
To create a New User, go to Access → Users, and find the button in the top right corner.
Select Admin User and fill out the form.
Send out an email invitation upon user creation by ticking the box in the form. The user will create their password.
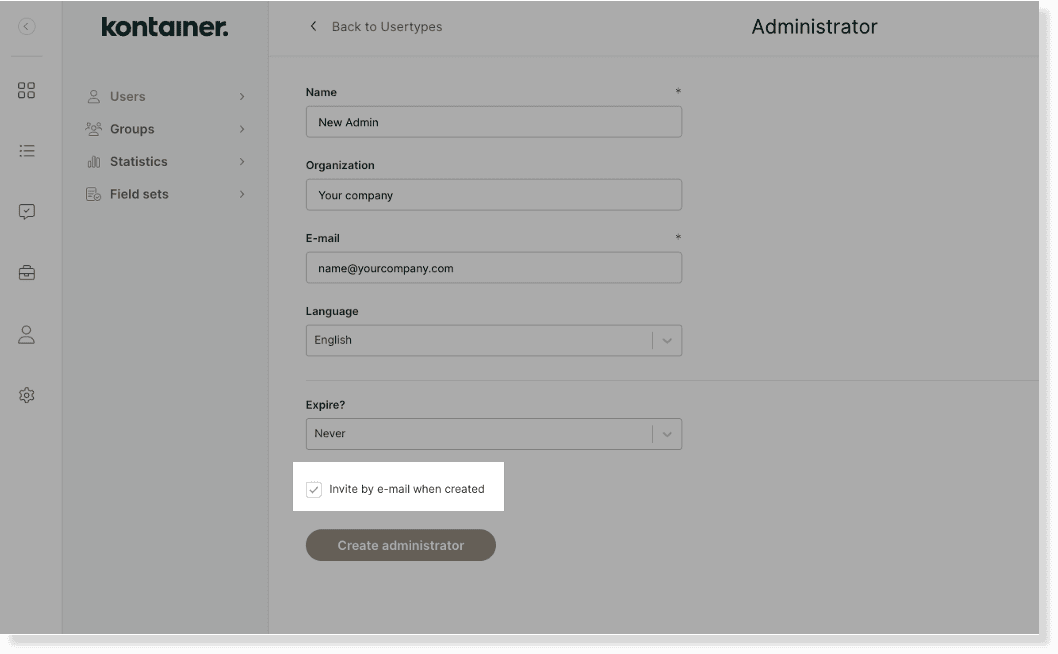
The invitation email can also be sent out later from the user profile.
If relevant, set up notifications on the user profile.
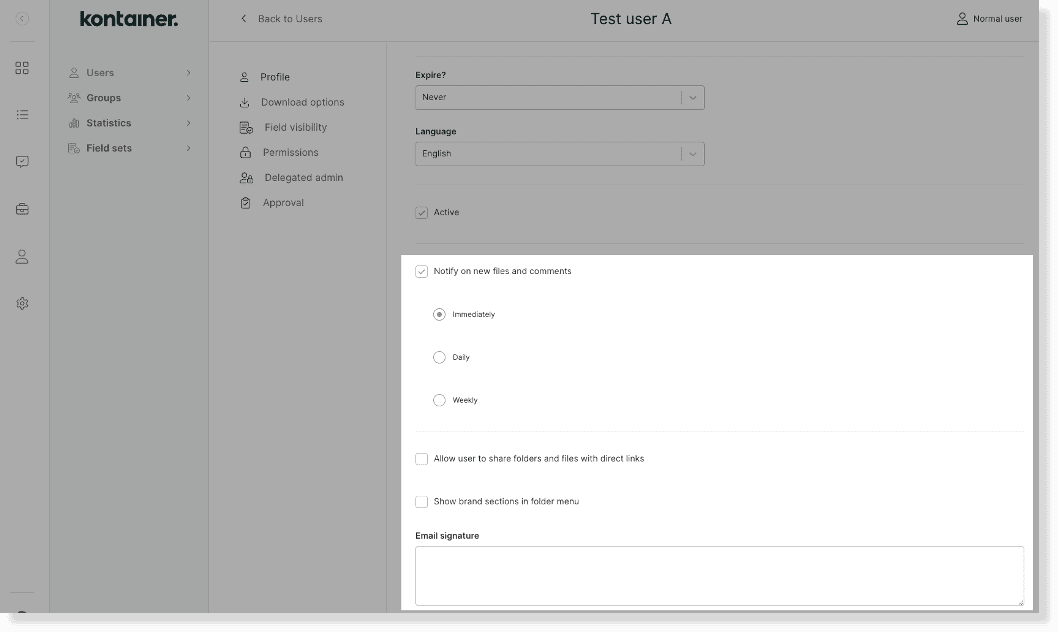
Users can also add it themselves under Profile Settings. In the same view, they can edit their email signature used when they share files.
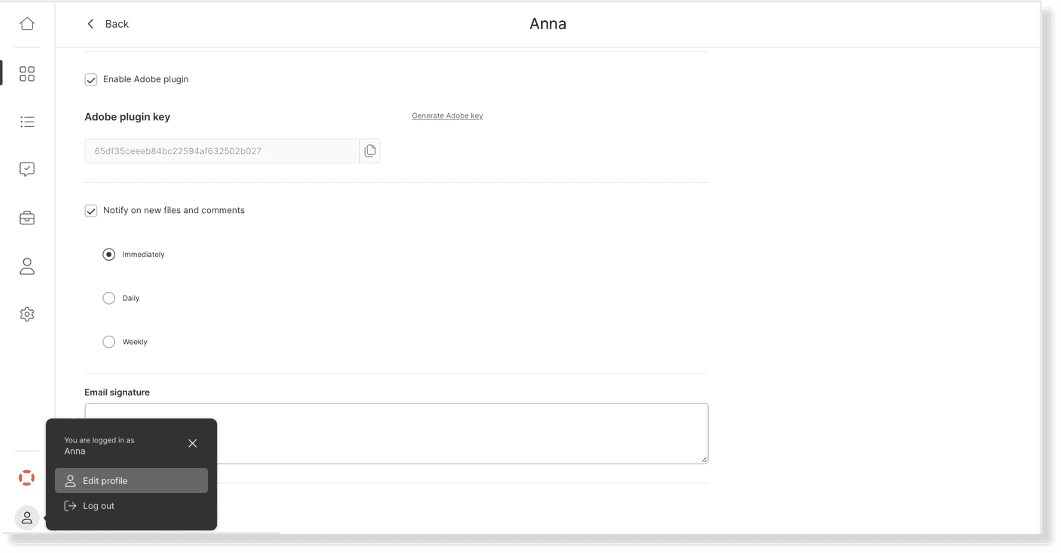
Create a Normal User
A Normal User can, like an Admin, subscribe to notifications when new files are added to folders, the ones they can see (see above).
The normal user is tied to an email address and password. The password is set by the user and can be reset on their request.
To create, go to Access → Users, and find the New User button in the top right corner.
Select Normal User and fill out the form.
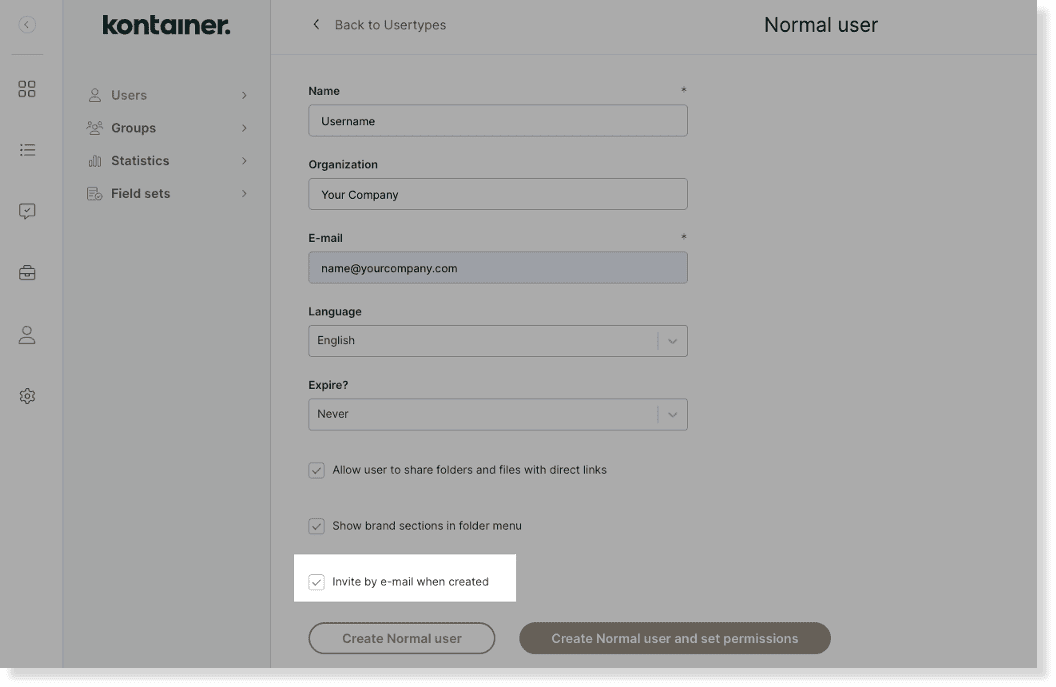
The normal user cannot access files and folders upon creation, so you can skip the invite option, click on Create normal user and set permissions.
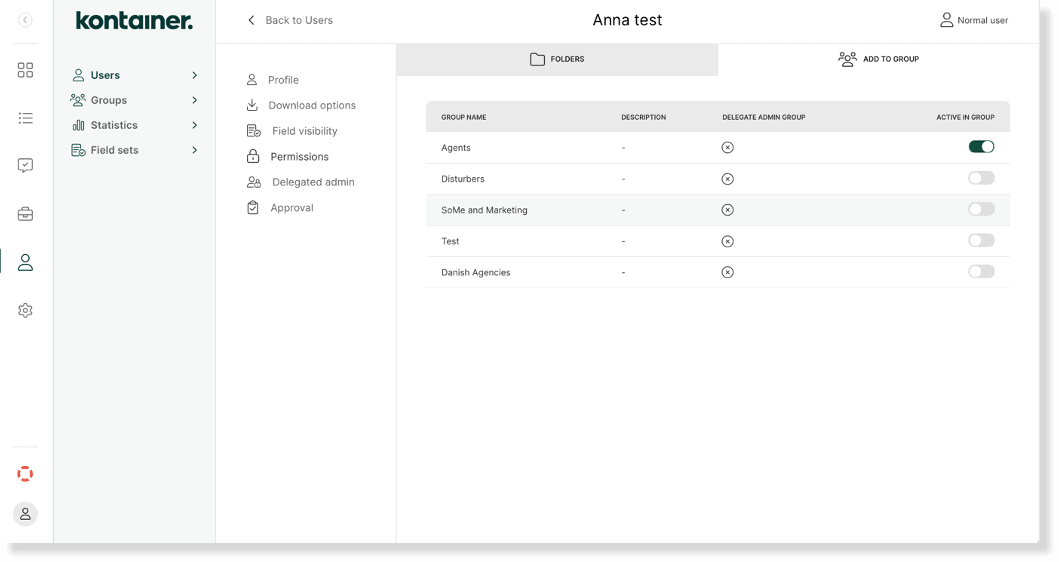
Now set permissions by:
- Adding the user to a group to inherit access from there
- And/or manually setting individual permissions
NOTE: Remember to go through the Download Options and Field Visibility settings on the user or group. These are important to ensure users can access files as well as data and download formats. Select settings regarding folder/file sharing and brand section on the user or group profile.
If relevant, set up notifications on the user profile.
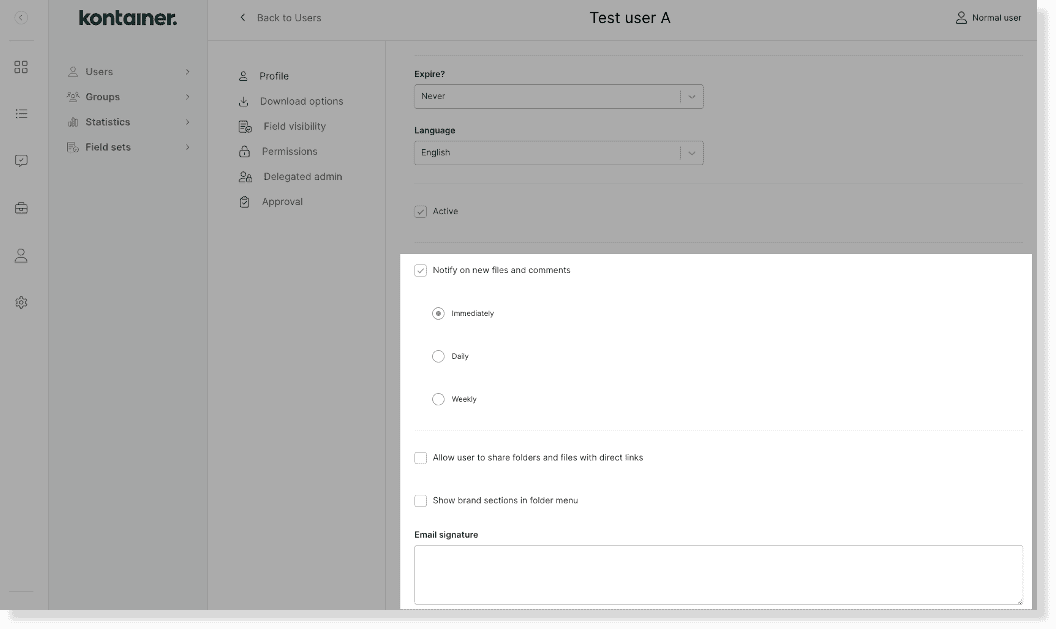
Users can also add it themselves under Profile Settings. In the same view, they can edit the email signature used when they share files.
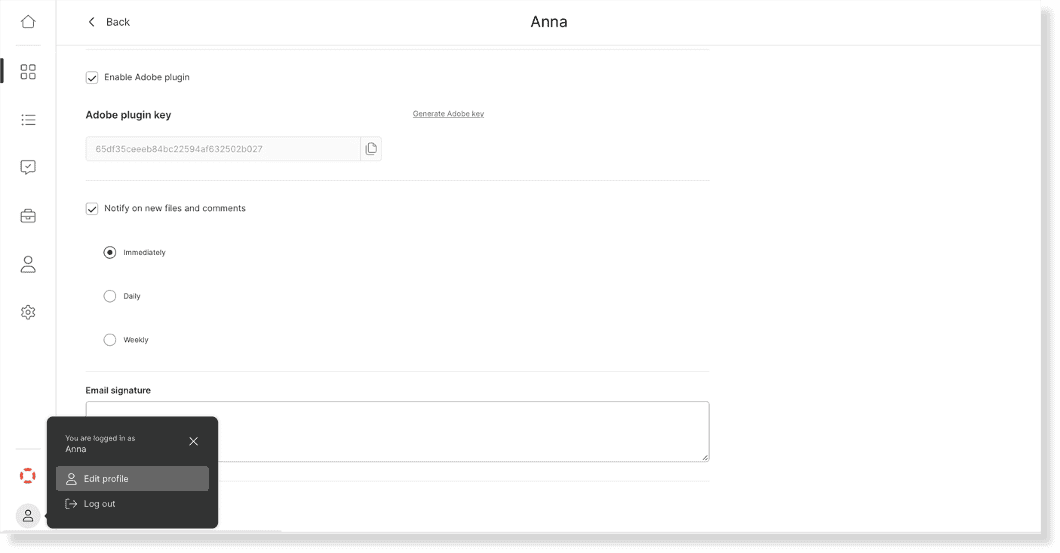
Once happy with the access setup, you can go to the user profile and send out the email invitation. From the invitation, the Normal User sets up their password and logs in for the first time.
Create an Open Portal
With an Open Portal, no login is required. The link takes you straight into the solution.
Customers typically use it to create public portals for external brand guides, a press kit, or an image bank.
It’s also a great way to send out an upload link for a photographer.
An infinite number of users can use an Open Portal, and you can always edit the user access.
To create, go to Access → Users, and find the New User button in the top right corner.
Select Open Portal and fill out the form.
Create the Open Portal and set permissions by:
- Adding the user to a group to inherit access from there
- And/or manually setting individual permissions
NOTE: Remember to go through the Download Options and Field Visibility settings on the user or group. These are important to ensure users can access files as well as data and download formats. Select settings regarding folder/file sharing and brand section on the user or group profile.
To retrieve the user URL, go to the three-dotted menu on the right-hand side of your user overview.
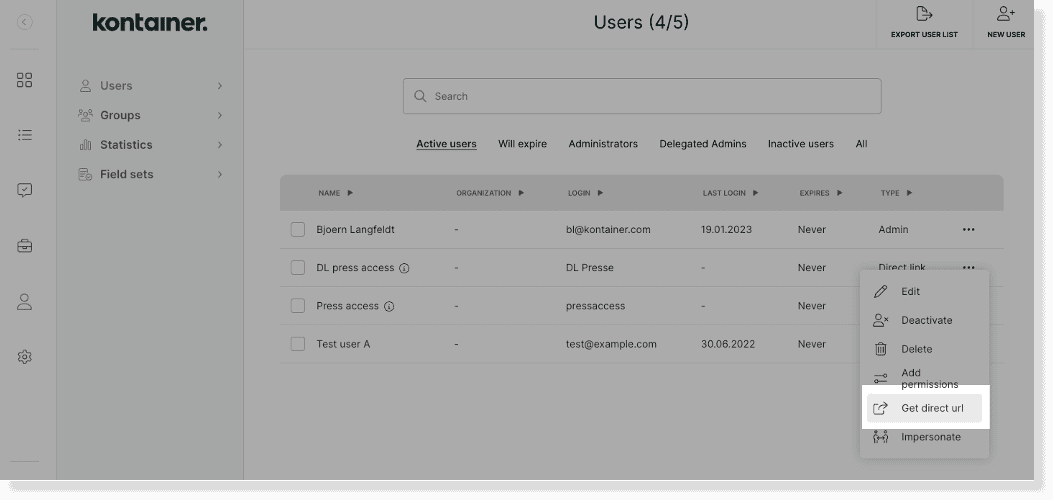
Click on Get direct URL.
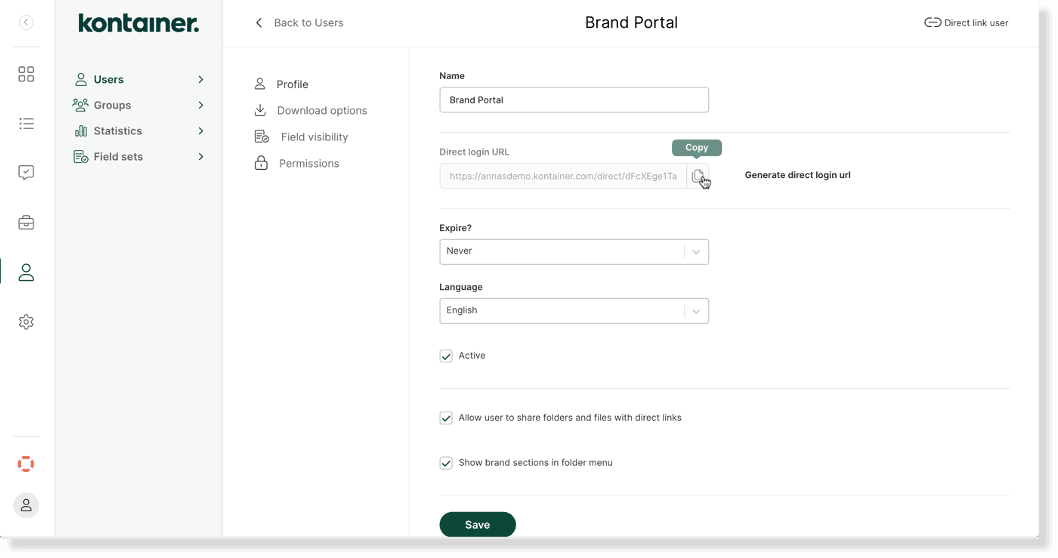
Or click on the Open Portal and find the URL from the user profile.
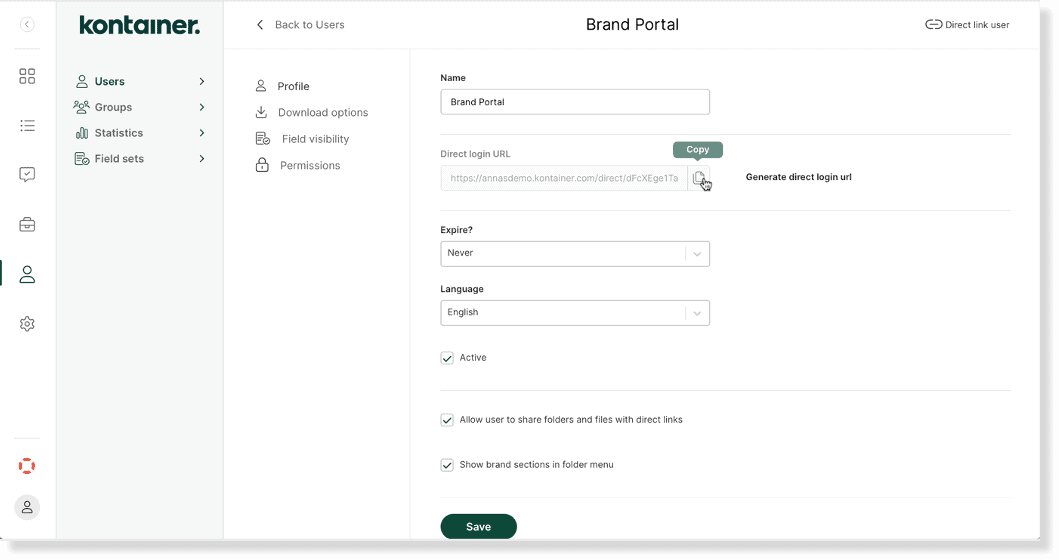
Create a Shared User
The Shared User is similar to an Open Portal with the addition of a login with username and password.
An infinite number of users can use a Shared User, and you can always edit the user access.
To create a New User, go to Access → Users, and find the button in the top right corner.
Select Shared User and fill out the form. Create the Shared User and set permissions by:
- Adding the user to a group to inherit access from there
- And/or manually setting individual permissions
NOTE: Remember to go through the Download Options and Field Visibility settings on the user or group. These are important to ensure users can access files as well as data and download formats. Select settings regarding folder/file sharing and brand section on the user or group profile.
Once you are happy with your setup, you can share the username and password details with as many users as you want.
And/or you can activate a direct URL on the user profile.
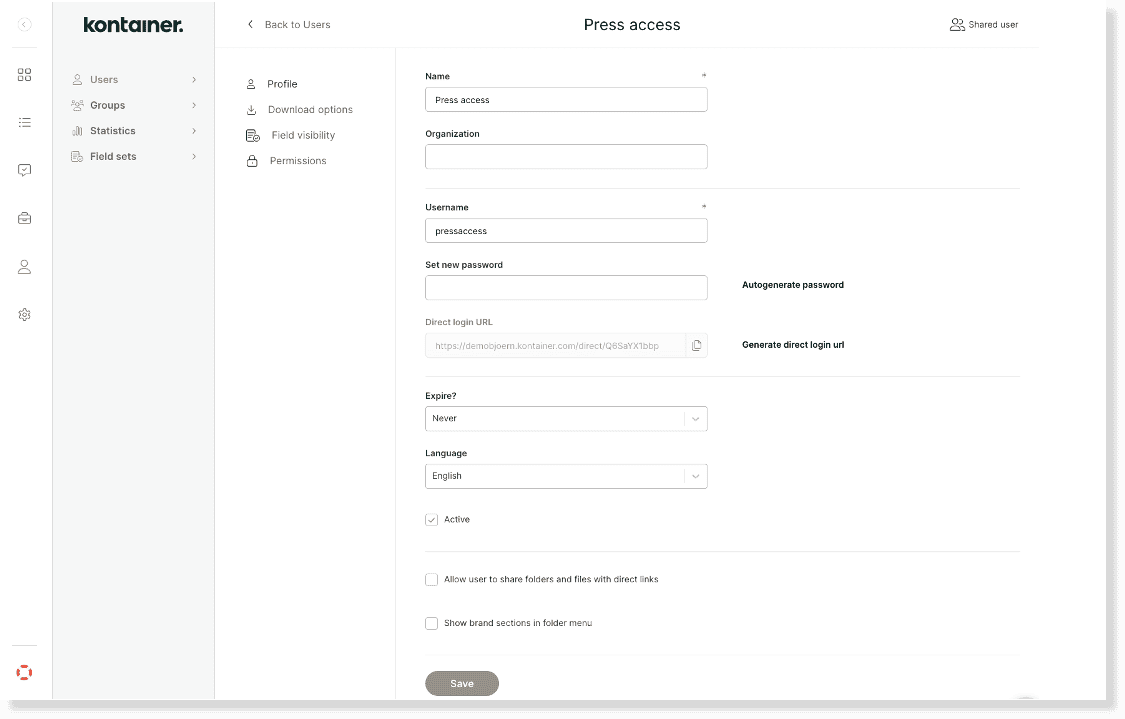
To retrieve the user URL, go to the three-dotted menu on the right-hand side of your user overview.
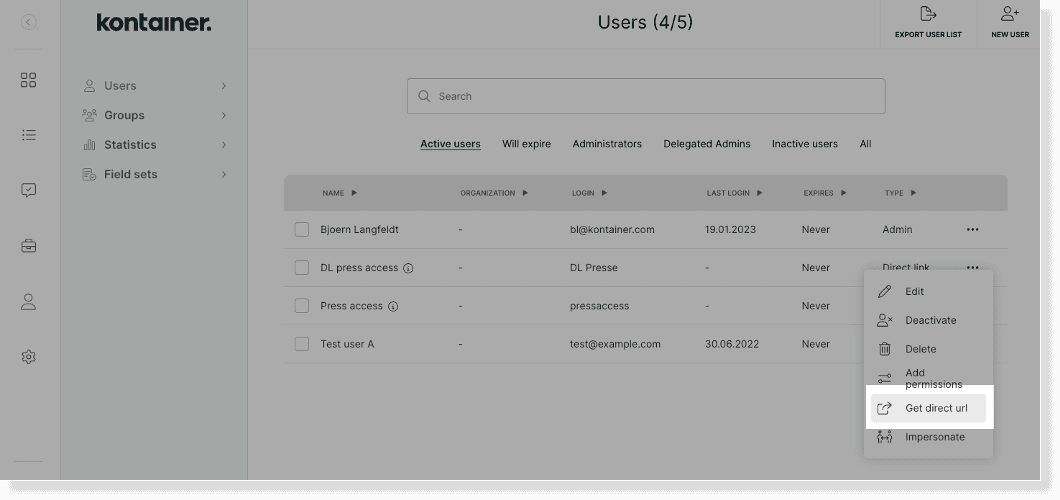
Click on Get direct URL.
Or click on the Direct User and find the URL from the user profile.
Add Users to Groups
When you add users to a group, they inherit the group’s permissions. This makes it quick to add new users and ensure they have the appropriate access.
The user can be a member of more than one group. Additionally, you can grant individual permission.
Create Single-Sign-On Users (SSO)
Premium+ feature
Set up users in Kontainer via SSO to create a secure and seamless experience for your internal users.
We have a standard setup for Microsoft Entra ID, ADFS and Google. Get in touch for other setups.
We create a ‘’Trust’’ between your AD groups (managed by your IT) and Kontainer. This means the user will automatically be created and assigned predetermined groups when they log in the first time. Like any other group in Kontainer, you can manage access settings on an ongoing basis. The settings include:
- Folder access
- Download options
- Field visibility
You can read more about settings in the respective sections of this guide.
To keep your user list manageable, you can determine rules that will deactivate or delete users that have not been logged in for a certain amount of time – like 2, 4 or 6 months. If a user logs in again after being auto-deleted, their user is simply reactivated.
Alongside SSO users, you can add other users and groups manually.
Get in touch with Jesper Sandberg, js@kontainer.com, if you are interested in using SSO.
Edit user type
As circumstances change, you may need to update the user type.
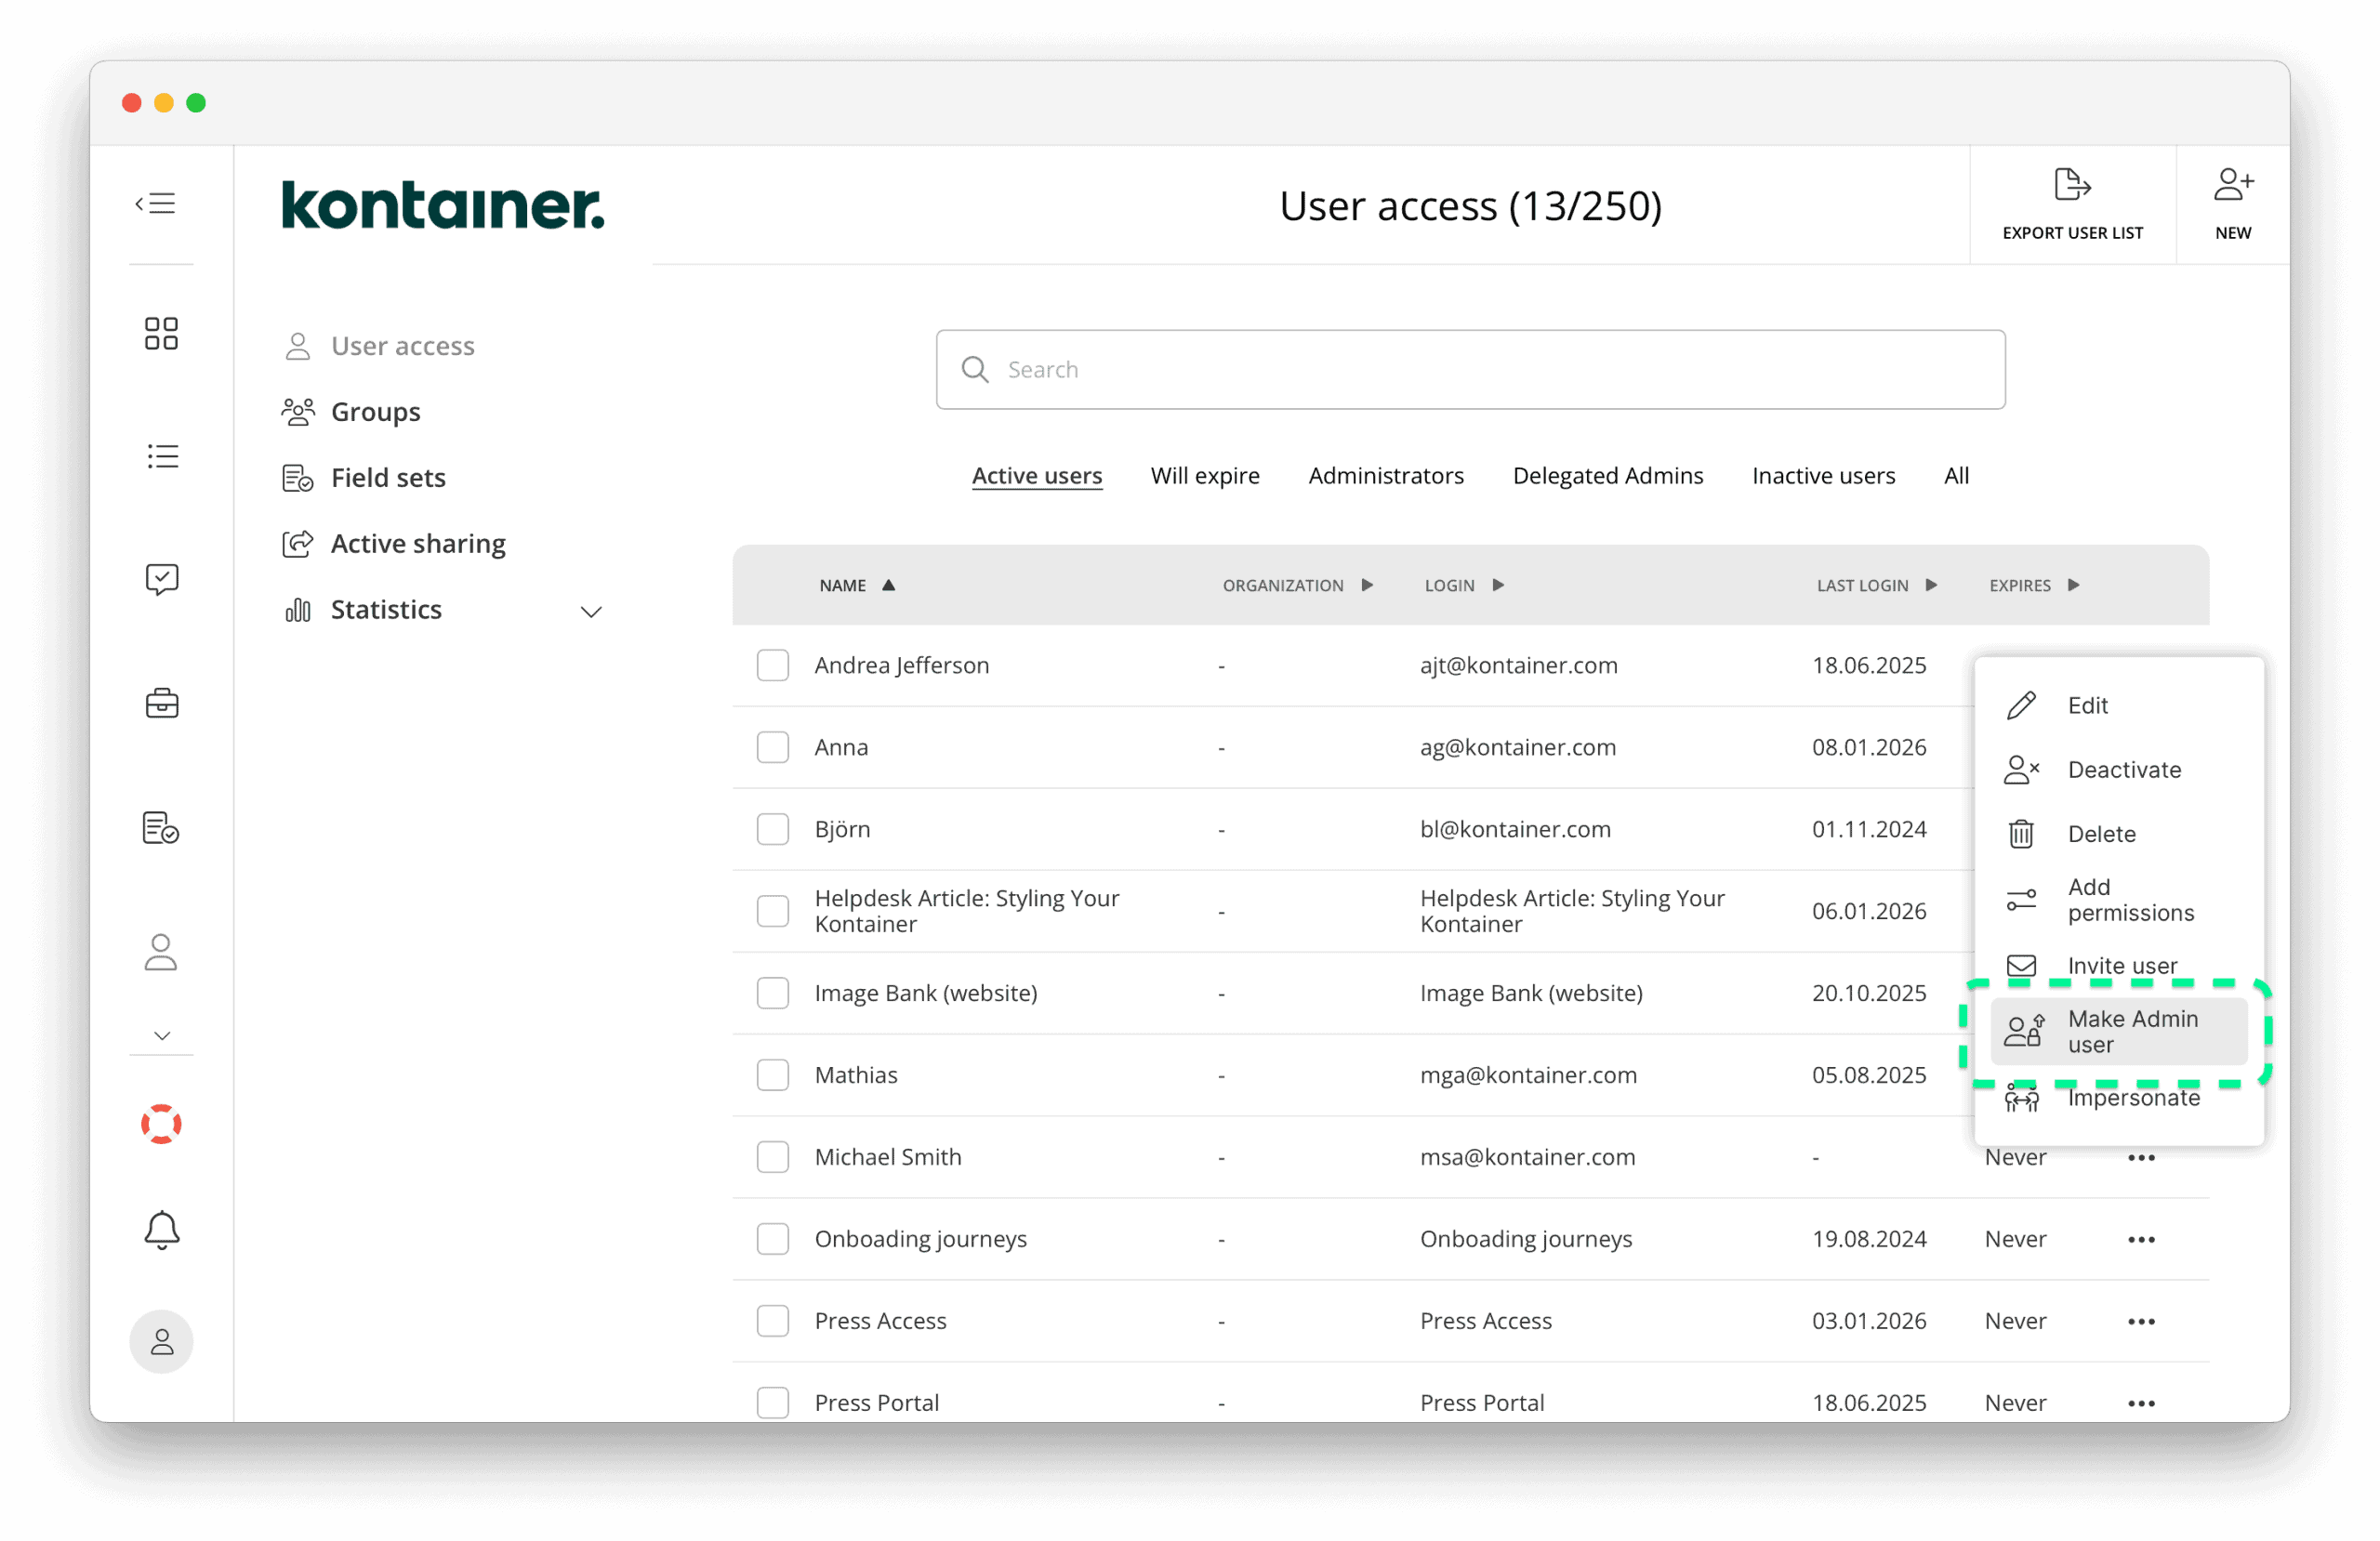
A Normal user can be upgraded to an Administrator, and an Administrator can be downgraded to a Normal user.
Simply go to the three-dotted menu on the right side of your user list, and you will find the option.
Delegated admin
Premium+ feature
Managing access can become time-consuming for larger organizations with many users across teams and locations. In this case, we offer the Delegated Admin option.
A Delegated Admin is a Normal User with the rights to create Normal Users and manage their access.
A Delegated Admin can never give access to anything they can’t access. It is a controlled way of allowing colleagues to manage the access of their teams.
Get in touch to learn more.
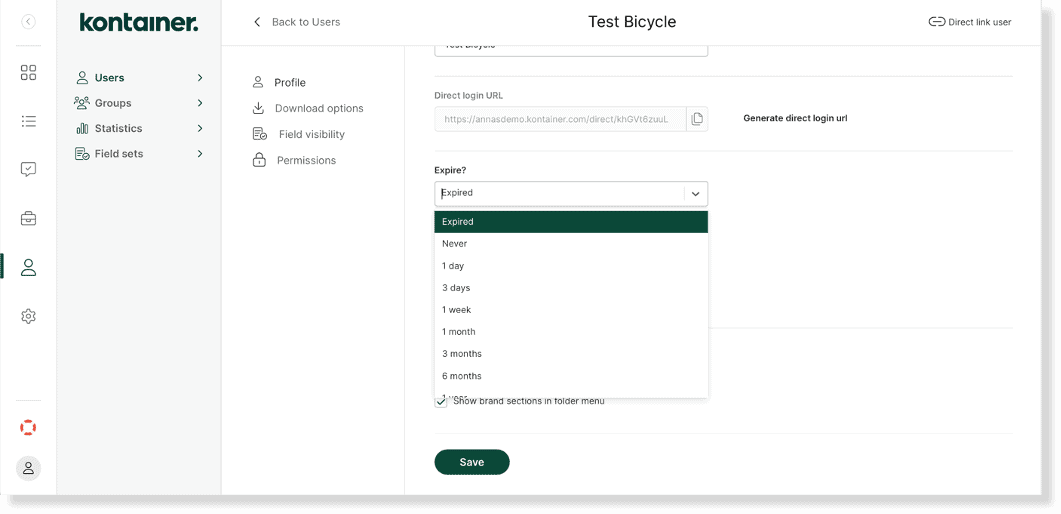
Set Expiry Dates
When you create or edit users, you can set an expiry date. At the time of the expiry date, the user will be deactivated. You will find these users in your user list under Inactive Users.
To reactivate, go to the three-dotted menu button on the right.
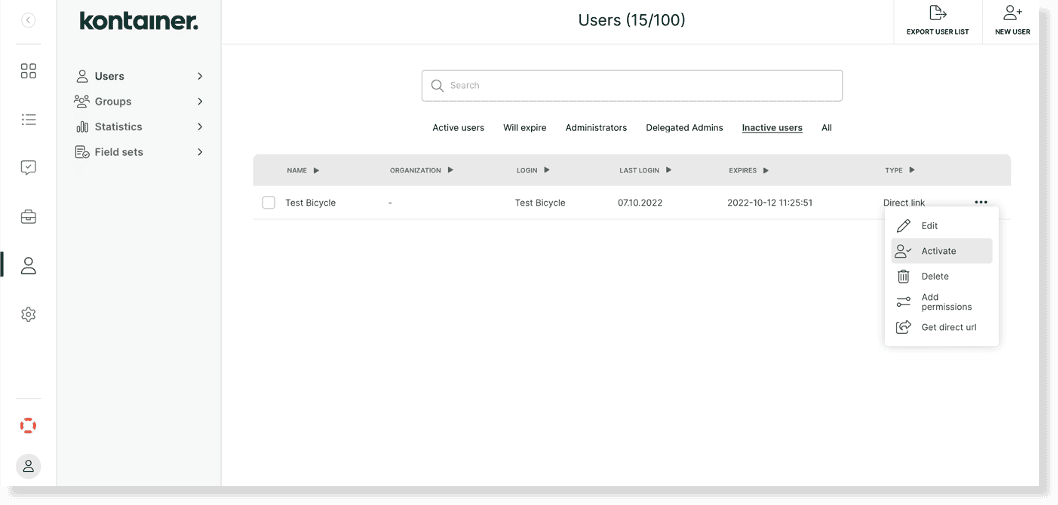
Or click on the user, tick the box Active and set a new expiry date, if relevant.
Impersonate a User
Try the Impersonate feature to check a user’s access. In your user list, click on the three-dotted menu on the right and select Impersonate.
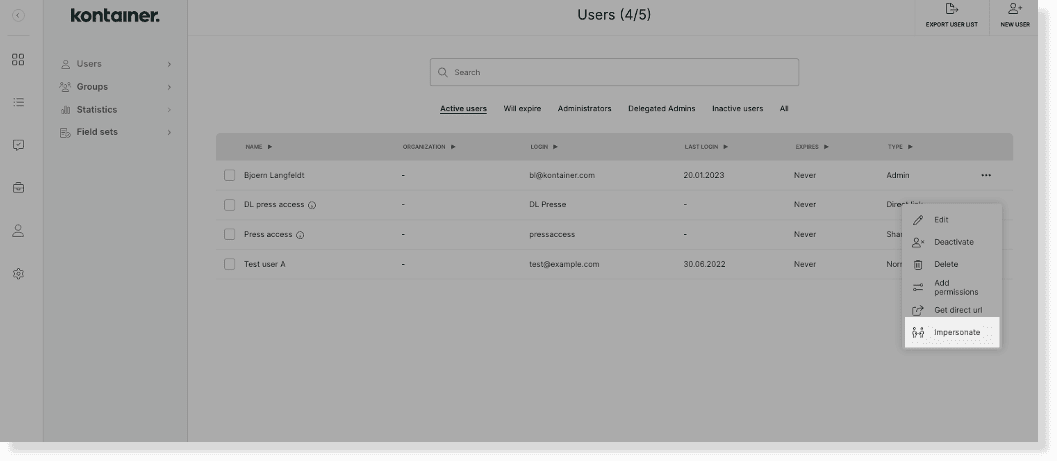
You are logged out of your admin account when you impersonate another user. To get back in, log out and then in again.
NOTE: No passwords will be compromised, as you will never be prompted to enter passwords.
USER LANDING PAGES/FOLDERS
Where a user lands when they enter the platform is important. The first folder/page they see might need custom text or design to introduce the user to your platform. See our guide on how to Make Custom Landing Pages here.
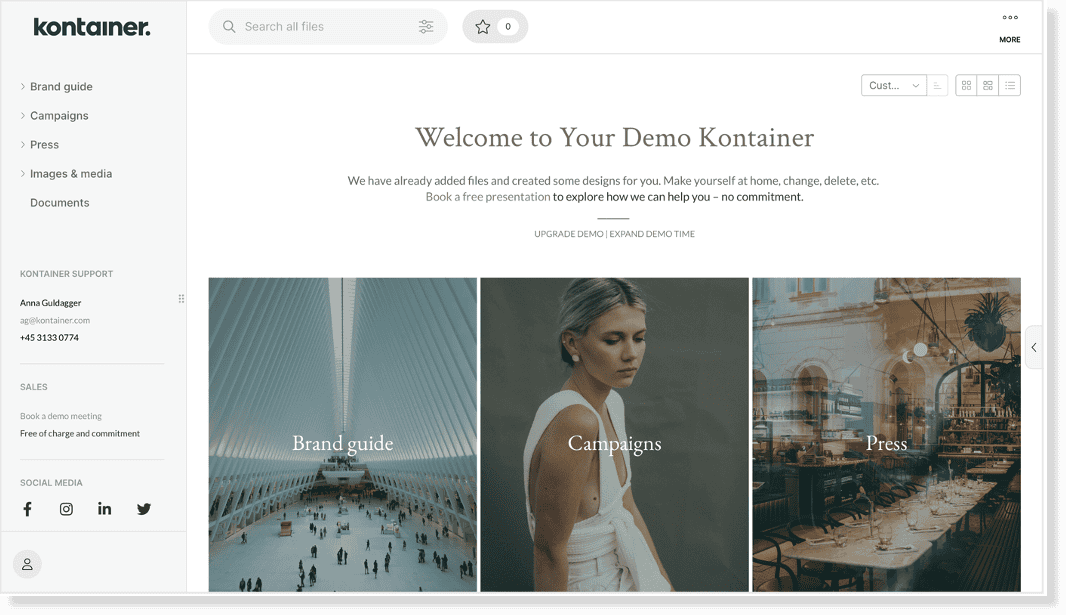
If a user has access to any of your main folders, their landing page will be the same as yours (your root folder, we call it).
If a user only has access to subfolders, the outermost layer will become their landing page. There is an exception with Open Portals and Shared User.
Change Landing Page on Links
You can change the landing page for an Open Portal and Shared Users. The access/user is still the same, but the folder/page they land in is changed. Typical uses include:
- Product launch
- Press release
- Link for a newsletter
To get the link, open the information section to the right and then the Direct URL section. Select the user you want, and a unique URL will appear.
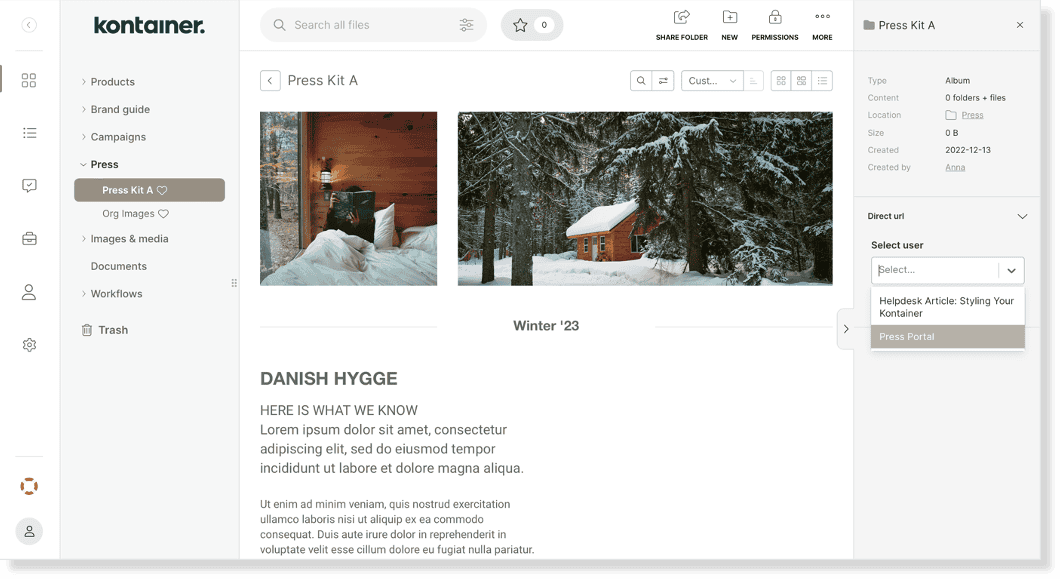
Copy the URL and insert it in an email, news story or other.
User Statistics
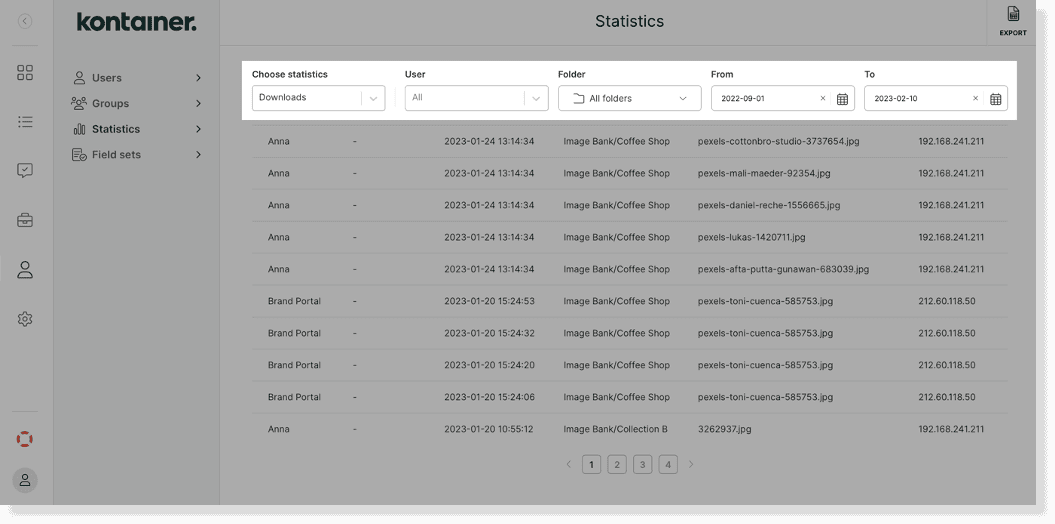
Keep an eye on how often users log in and what they download under Access → Statistics.
If user statistics is important to you, be aware that shared users (Open Portal and Shared User) will not give you exact data on who is downloading files. The data collected is per user.
Filter and download data by
- Folder
- User
- Date Range
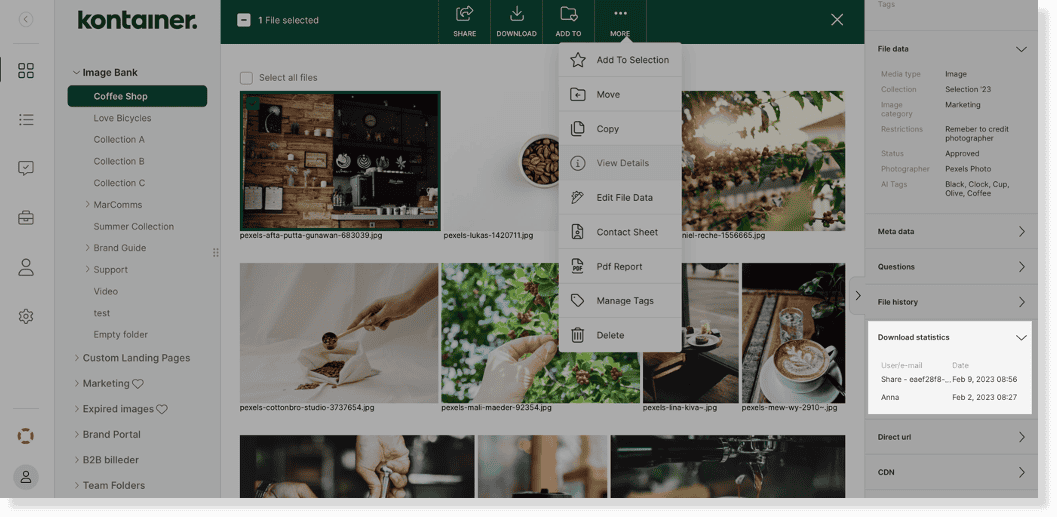
To view download statistics on a specific asset via the info bar to the right. You open the information bar from the three-dotted More menu on the image or in the drop-down banner at the top. Here you select View Details.
REGISTER FORM
Pro+ feature
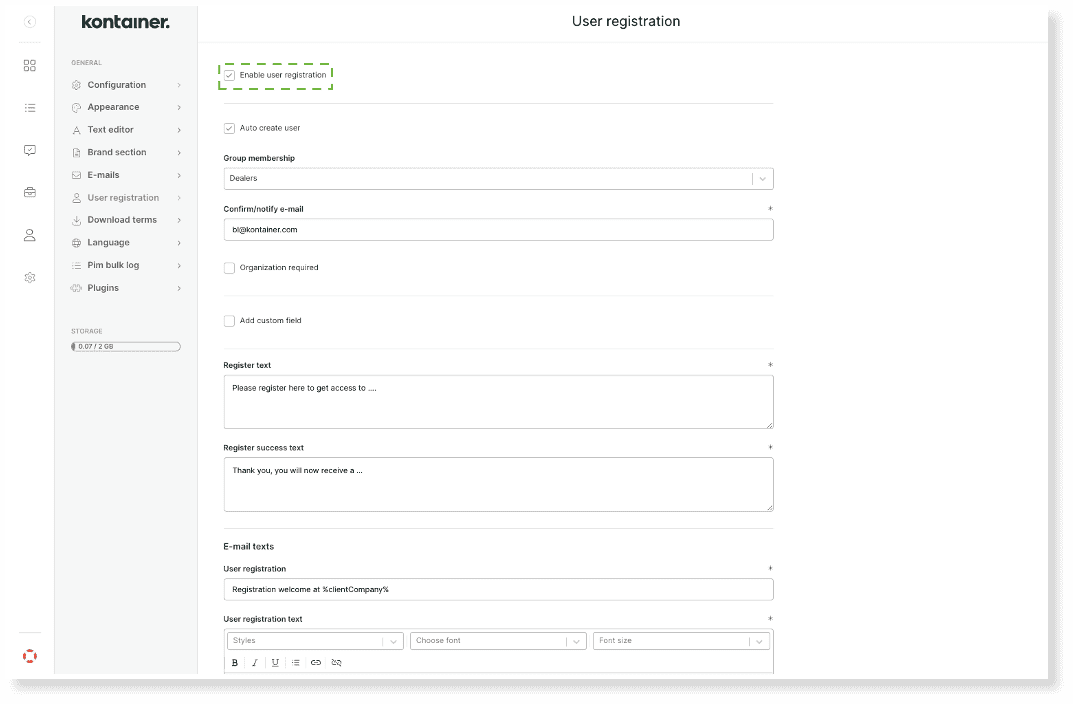
You can allow users to self-register by activating the feature on your Kontainer.
Go to Settings → User Registrations and enable user registrations.
You need to define to which user group self-registered users will belong. And whether they are automatically added or manually after approval.
You can edit the text in the register email notifications. Be aware not to change the %automated% text.
UPDATE ACCESS
You will need to adjust access from time to time. Go to the Access menu or click on the Permissions button in the folder to edit.
Edit Folder Permission Locally
After the initial setup, you can always edit the group and user access to your folders.
NOTE: By default, access is inherited by subfolders. Also, newly created subfolders will inherit access rights unless manually changed.
Release Dates
Premium+ feature
We have that option available if you need to set specific release dates for folders/content.
A new option will appear in the folder Permission feature. Here you can manage the release dates for different groups.

Get in touch if you want that activated or included in your plan.
SHARE FUNCTION
To share files via a simple share link or email, use Kontainer’s Share function. Select files or folders and click on the Share button.

Be aware that download and user statistics do not cover the share function.
You can read more about the share function in our guide here.
–––
Thank you for visiting the Permissions guide here on the Kontainer helpdesk!
Please let us know how you get on, and don’t hesitate to contact customer support if you have any further questions.